Off the Wheaten PathOff the Wheaten PathOff the Wheaten PathOff the Wheaten Path
Showing posts with label Dinner. Show all posts

Monday, September 5, 2011

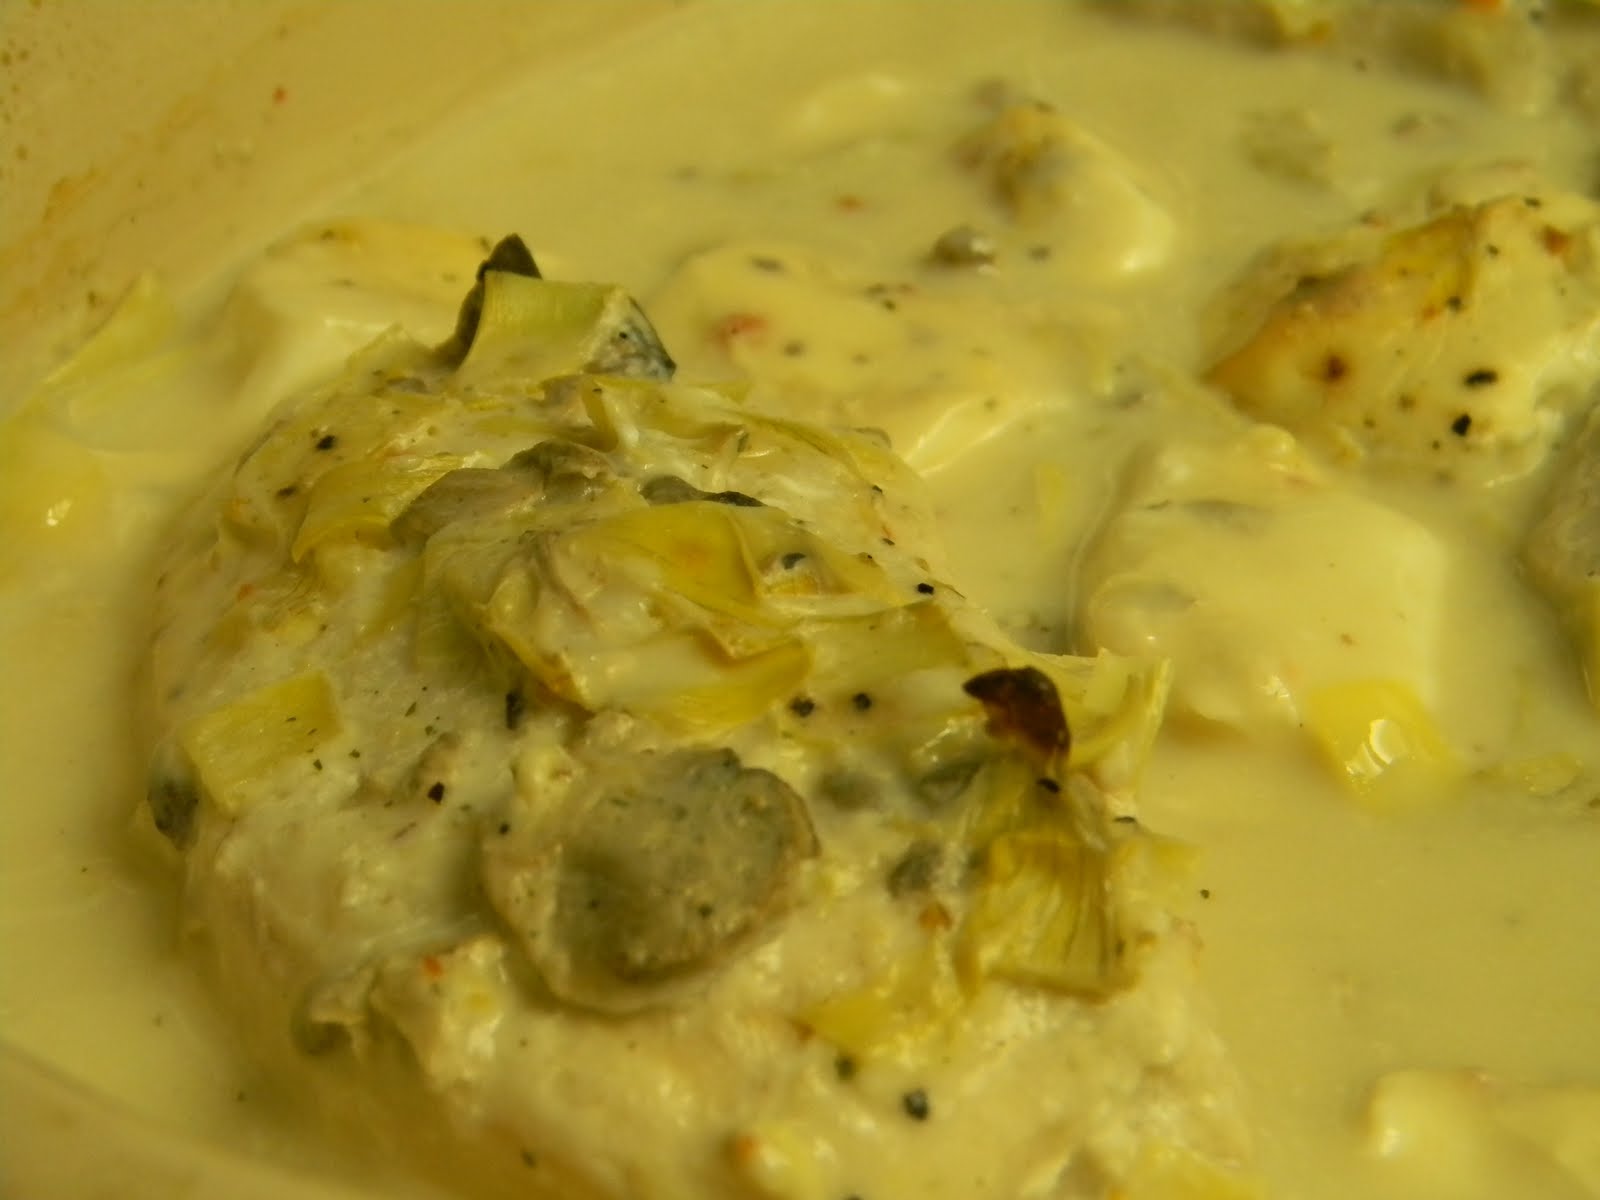
Easy Gluten Free Italian Cream Cheese Chicken


I am recovering from a fairly horrible jury duty stint last week, and I noticed that the one night I wasn't completely in Momzilla mode was the night that I had this chicken dish all ready to go. It's super easy and I think everyone in my family actually ate it...which is reward enough for me. Plus, since everyone's gone back to school I'm relying more heavily on my meal plans, which I think have made life so much easier for me with all the craziness that goes on after school. This recipe takes about 5 minutes to throw together and put in the oven, so it's definitely on the list. I love the flavor in this recipe...it's creamy and flavorful and the chicken stays moist and tender. Put some cream cheese on the grocery list and try this recipe to see if your family likes it, too.

Gluten Free Italian Cream Cheese Chicken

1 brick of cream cheese (can be low fat or regular)
1 packet of Good Seasons Italian seasoning
1 can Progresso Creamy Mushroom gluten free soup
1 can DeLallo artichoke hearts, drained and quartered (I like to buy the uncut ones and cut them myself, then I can pull out any tough pieces.)
4-5 chicken breasts

Preheat oven to 375 degrees. Spray a 9x13 pan with nonstick cooking spray and set aside. Place chicken breasts in the bottom of the pan. Pour soup over chicken, top with seasoning packet, artichokes, and cube or break up with your hands the brick of cream cheese and scatter over the top. Bake for 1 hour. Serve over rice. Can also be made in the crock pot by placing chicken in crock pot, dumping all other ingredients over the top, and cooking on low 5-6 hours.

Happy eating!

Wednesday, March 30, 2011

Gluten Free Chicken Ranch Mac and Cheese

Apparently I'm obsessed with pasta lately. My daughter made mention of the fact last night as I was hemming and hawing about what I should put on my weekly menu plan. She said, and I quote, "Not pasta! Please not any pasta! I'm so sick of it." Well, miss high and mighty, why don't you come up with a quick dinner for seven that is budget friendly and everyone will eat, hmm? I digress.I definitely have my favorites when it comes to gluten free pasta. I like the Annie's Gluten Free Deluxe Macaroni and Cheese because it reminds me of the Velveeta one. You know, the one that is super creamy and has the huge shell pasta in it? I used to love those. Nowadays I buy super cheap Western Family macaroni and cheese for everyone else, and for the last few months I have seen a recipe they have on the back of their box for Chicken Ranch Mac and Cheese that I have glanced at and thought, I wonder if that's any good. Last night I took the plunge and decided to try it with my Annie's Mac and Cheese.

All I did was make the pasta according to the directions on the package, then I added 1 small can of white meat chicken, 1/2 chopped tomato, and 2 T of Hidden Valley Ranch salad dressing. If I had had any green onions I would have added those, too. It tasted so good to me I couldn't wait until lunch today to eat some. So I had more last night before bed! I love that this small addition makes the dish have more protein, some vegetables, and the ranch taste complements the cheese sauce really well. Quick and easy dinners? I'll take it every time.

Happy eating!

Friday, March 25, 2011

How to Make Gluten Free "Okie" Gravy

I don't actually know the technical name for this kind of gravy. My mom's friend from Oklahoma had us out to visit one time and her mother made this gravy for a big family dinner, and forever after it's been Okie gravy. I hope that's not offensive or anything. We love our Okies, and it's way easier than saying Oklahomans.

Anyway, I was showing my 12 year old how to make gravy the other night, and it dawned on me that a lot of people probably don't know how to make gravy or are afraid to because they might mess up. I decided to show how I do it and, to ease your anxiety, I'm going to also point out all the things I did wrong when I made this here batch that I took pictures of. Perfect gravy is elusive, but imperfect gravy can still complement a meal.

First of all, I made a batch of pork chops that I breaded in egg and Dr. Schar's gluten free bread crumbs with a little salt and pepper. I usually brown them on both sides in some canola oil and then turn the heat to low, cover them, and steam until the pork is cooked through. I turn them once during cooking. When you remove the meat from the pan, the leftover drippings are the flavor base for the gravy. Heat the oil/drippings over medium heat until they start bubbling.Mistake #1: I used too much oil in the pan when I browned the chops. I should have taken out a couple of teaspoons of it so the gravy wasn't too greasy. Oh, well.

Next, you need to get the little browned bits of meat off the bottom of the pan so they can make the gravy flavorful and delicious. This is called deglazing the pan. This can be done with whatever liquid you want to make the bulk of the gravy with, such as water, wine, stock, or in this case, milk. I added one cup of milk and whisked the bottom of the pan to get the drippings to release. Heat this mixture to a boil.

Get out your Kingsford's cornstarch and add 2 tablespoons to 1/4 cup of water in a mug or liquid measuring cup. You just need something with a handle so you can whisk and pour at the same time. Mix them together until the cornstarch is dissolved. This is called a roux. Pour a little bit of the roux into the gravy and whisk it constantly while it's boiling and see if it gets thick enough. If not, add a little more until you get the consistency you desire.
Mistake #2: I added all the cornstarch mixture because I wasn't focused on the gravy, I was focused on the boys fighting over the XBox in the other room. The gravy was too thick.There are two things most people forget to do when they are making gravy. One, they stop whisking and it gets lumpy. Two, they forget to taste it. Taste the gravy and season with salt and pepper until it meets your standards.
Mistake #3: Because I used too much oil to begin with, it diluted the flavor of the drippings so the gravy was a little weak.
However, I fixed my last two mistakes by adding a little bit more milk to make the gravy thinner, and I added 1/2 teaspoon of Chicken Better Than Boullion and that brought the flavor right up to where it needed to be. Imperfect gravy, still delicious. You can see in this picture how thick the gravy is on my potatoes. But I don't mind it thick as long as it tastes good.

I hope this helps someone out there who has been gravy-phobic until now. You can do it! Gravy awaits you! Happy eating!

Wednesday, March 23, 2011

Gluten Free Hamburger Casserole...So Good When You Feel Not So Good

This may come as a shock to some of you, but I love me some good comfort food. Okay, maybe that's not a shock. Casseroles, one-pot meals, crock pots, a-can-of-this and a-can-of-that, it all makes me happy. I Actually, when I hear the words comfort food, I think of easy meals that you wouldn't be afraid to eat at home in your sweats with your hair pulled up in a ponytail and no makeup. Which is exactly what I looked like when I made this easy and yummy crock pot dinner. I am still not quite on my A-game yet, and after being sick for 16 days now, my family was really excited to eat something, anything, that wasn't microwaveable. My husband even liked it, which is a plus. (Apparently he hates my alfredo sauce but is too scared to tell me.)

I used to love eating Hamburger Helper's Potatoes Stroganoff back in the gluten days (yes, I proudly admit that Hamburger Helper was part of my cooking repertoire), and I really wanted to make something gluten free that tasted like it. This was my warm and satisfying solution.

Some folks will scoff at the ingredients in this dish and say it's too lowbrow to be considered for a food blog. Some people will think this dish looks terrible and probably tastes worse. Some people might not find the appeal in potatoes and soup cooked in hamburger all day. I disagree. All gluten free foods, including canned green beans, can have a place at the table. Who doesn't want a fast, easy way to make a delicious dinner that fills you up? And the gluten free types, we don't care so much if it's fancy, we just care if it's not toxic! And as anyone with any kind of a budget will attest, finding a way to make a package of hamburger appealing is the grand adventure for families all over America. So anyway, here's the recipe for Gluten Free Hamburger Casserole, done up right in the crock pot.

Gluten Free Hamburger Casserole
adapted from the Fix-It and Forget-It Cookbook

1 1/2 pounds browned hamburger
6 potatoes, peeled and sliced into rounds
1 onion, sliced
dash of salt and pepper
1 can of green beans with the juice
1 can Progresso Creamy Mushroom soup (in Utah, only available at Smith's)

Layer the browned hamburger in the bottom of the crock pot. Top with the potatoes, onion, salt and pepper. Pour green beans and juice over all. Pour soup over green beans. Cook on low for 5 hours. Serve with Gluten Free Biscuits Supreme.

I cooked mine in the crock pot for about 6 hours and the potatoes were a tad overdone, but crock pot cooking times vary so check your potatoes at 5 hours and if they aren't quite done cook another hour. I ate this heated up for lunch today and it was just as good as the night before. That, if anything, makes me feel better.

Happy eating!

Monday, March 7, 2011

Super Easy Gluten Free Pasta Alfredo with Seafood


Ugh. Sickness. Everywhere I turn there's sickness in my house. Four of the seven people who live here are sick, including me. I have spent the last three days in my bed, which normally would make me really happy, but when I feel this terrible it's just not worth it. So that explains the lack of posting this week. Sorry, but sometimes life intervenes with blogging.

And sometimes life intervening causes creativity to surge, if only for a moment. When I started feeling like I was coming down with something, I thought I could make a simple pasta dish for dinner that would take 15 minutes, tops. As the noodles were boiling I realized three things. One, I had no alfredo sauce or Prego sauce in my pantry. Hmmm, how about a scratch sauce? No cream in the fridge, either, and not much milk because I hadn't been to the store for a few days. Sometimes scrounging in the pantry produces great results. I found a can of evaporated milk and a can of tiny shrimp. I had just enough Gruyere cheese left over in the fridge from another recipe to make a sauce. Whew, that was a close one. What could have been a dinner disaster turned out to be a delicious variation of one of our favorites. I thought it tasted divine, and I cooked some more noodles and added the leftover sauce the next day for lunch and it was just as good as the day I made it. Here's the super easy recipe:

Gluten Free Easy Alfredo Sauce

1/4 cup butter
1 cup evaporated milk
1-2 cloves minced garlic
1 cup grated Gruyere cheese
1/2 cup freshly grated Parmesan
2 T parsley
1 can drained tiny shrimp
1/4 cup frozen peas, thawed

Melt butter in a saucepan. Add milk and garlic and cook over medium heat until just below boiling, stirring constantly. Add cheese and parsley and stir until melted. Add shrimp and peas and heat through. Serve over Tinkyada Gluten Free Noodles.

Happy eating!

Monday, January 10, 2011

Gluten Free Garlic Pork Roast

I bought a pork sirloin roast the other day for a Sunday dinner. It's been a while since I've made one and when I got home I realized I had forgotten how I had ever even cooked one before. I took a chance and thought I would try to bake it similarly to the Perfect Pot Roast, but I thought that the pork would taste better with different seasonings. I guessed right! Here's how I did it:

Gluten Free Garlic Pork Roast
1 2.5-3 lb sirloin pork roast
2 T crushed garlic (the kind from a jar)
salt and pepper
2 tsp better than boullion beef flavor paste
3/4 cup water

Preheat oven to 350 degrees. Spray a large dutch oven with Pam. Place pork in dutch oven and spread crushed garlic over the top of the meat. Sprinkle salt and pepper over garlic. Add boullion paste and water to bottom of pot. Cover, bake for 1 hour at 350 and then turn heat down to 250 for 4-5 hours. Makes a delicious gravy.Gravy:
Place dutch oven with drippings in bottom on stove burner and turn heat to medium high and bring to a boil (about 1 minute). When boiling, add 2 T white wine to bottom of pan and scrape drippings off with a spatula or rubber spoon. Add 1 cup water, bring to a boil, then add a roux made of 2-3 T cornstarch and 1/4 cup water. Stir until boiling and thick. Season with extra salt and pepper, if necessary.

Happy eating!

Friday, December 3, 2010

Easy Gluten Free Red Beans and Rice

Do you ever have one of those nights when something sounds good for dinner but you just can't put your finger on what it is so you can figure out how to make it? That happens around here a lot. Sometimes my poor family is just sitting around waiting for me to make a decision about what the heck we are going to eat and they grab a bag of chips and settle in, waiting for me to talk to my stomach long enough to start cooking. One night, I was under the gun because we had parent teacher conferences, I had put rice into the rice cooker and had no clue what to put with it. I couldn't really find anything I already had in my cookbooks at home, so I perused the internet for a while and actually found something really delicious and fast on some recipe website which I swear has disappeared from civilization. I hate it when I forget to write down a source! So someone out there created a great recipe and it is super easy and tasty. It's a quick and easy version of Red Beans and Rice you can make in about 15 minutes.
I have loved Red Beans and Rice since I was in college and my boyfriend's roomate's girlfriend (did you follow that? I should have just said a nice girl from Louisiana) made me some authentic, cook-all-day down south Red Beans and Rice. It's so nice to make things that cook all day, but this is a great alternative when it sounds good and you just run out of time.
The sad thing is, I got the dinner all made, rice was ready, beans were ready, and we had to walk out the door to the school so we wouldn't be late. So I simply put the beans and sausage in my little crock pot to keep them warm while we were gone for an hour or so and we ate when we got home. No biggie. I'm always trying to cook as much from scratch as I can, because I believe people should know how to make stuff without small appliances in case they break. But they sure come in handy in a pinch. Oh, what could the pioneers have done with their lives if they'd had rice cookers? Invented the internet, that's what. So here's the recipe as I made it:
Gluten Free Red Beans and Rice
1 T butter
1/2 minced onion
2 cloves garlic
1 28 oz can of diced tomatoes
1 kielbasa sausage, sliced into medallions
1 can light red kidney beans, drained
1/2 tsp each of:
paprika
chili powder
cumin
Pinch (seriously, one small pinch) of red pepper flakes for heat
Melt the butter in a large frypan. Add the onion and saute until soft, 2-4 minutes. Add garlic and cook for about 30 seconds. Add tomatoes, sausage, beans, and spices and simmer until reduced down. Can also put into the crock pot and cook for 1-2 hours on low to keep warm until you can eat them. Serve over white rice.
Happy eating!

Monday, November 8, 2010

How to Make the Perfect Gluten Free Pot Roast--Never Underestimate the Power of a Stranger

Yesterday was Sunday, and I really had a hankering for a good Sunday Roast. Lucky for me there's complete strangers out there who know how to make them! I can remember the first time I had really great roast: I was about 10 years old and an older couple in our neighborhood invited my mom and I over for dinner one Sunday after church. She presented a lovely roast, and even in my tender years I was dying to know how she made the meat taste so yummy. She said, "You just cook it in the oven and it tastes like that." Of course I didn't believe a word of it, and continued the rest of my life believing she had a secret she just couldn't bear to share with me. So a few Saturdays ago, I was perusing the meat selection at the local grocery store and happened to see another mom with a cart piled almost as high as mine, and I took the chance of being the crazy woman who talks to complete strangers in a store. "I never know what cut of meat to get for Sunday Roast," I said loudly in her direction. She smiled and asked if I wanted a tender fall-apart roast or a slicing roast. I knew I'd reeled in an expert. So here's what she taught me in the meat aisle:
1. For a tender, melt in your mouth roast, buy a rump roast. They are a little more expensive, but worth it.
2. Slice an onion and place it on the bottom of the pan and then lay the meat over the onions, so it keeps the meat from sticking to the bottom of the pan. (Genius!)

3. Mix together a can of cream of mushroom soup (I use Progresso Creamy Mushroom, only available in Utah at Smith's Grocery stores, which is now labeled gluten free on the front!) and a packet of Onion Soup Mix (I use the Western Family brand) and dump over the meat to keep it nice and moist and make a delicious no-work gravy.
4. Here's the trick that makes it all work: Cover the pan and bake the roast for 1 hour at 350 degrees, then turn the heat down to 250 degrees and bake for 5 hours.

Seriously, the lady speaks truth. And the older lady in my neighborhood also speaks truth: Just bake it in the oven and it will taste that way. This was one of the best roasts I've ever eaten. We had it when my brother in law and his two teen sons were visiting us and the whole platter was eaten and the compliments just kept on coming. So when you're in the mood for a great Sunday hunk of beef, try cooking it this way and see if you don't love it so much you could marry it.

Happy eating!

Monday, October 25, 2010

More Fun With Greek Yogurt: Greek Burgers with Tzatziki Sauce


Sitting at my computer this morning eating my breakfast of a yogurt parfait with granola (which seems to be my go-to breakfast these last few weeks), I decided I really wanted to find another recipe that uses this high-protein, gluten free yogurt. Luckily Emilie from Yoplait had emailed me some yummy yogurt recipes and I think this is one I'm going to try soon, because a)I've never actually eaten a turkey burger, and b)I have had yogurt/dill sauce before and it is DIVINE, and c)the only substitution I'll have to make is getting my own gluten free hamburger buns.


Greek Burgers with Tzatziki Sauce

Sauce:
1 6 ounce container Yoplait Plain Greek Yogurt
1/4 cup chopped cucumber
2 tablespoons chopped red onion
1 tablespoon chopped fresh dill weed or 1 teaspoon dried dill
2 teaspoons lemon juice

Burgers
1 pound ground turkey
1 cup (4 oz) crumbled feta cheese
1/3 cup chopped red onion
1 tablespoon chopped fresh dill weed or 1 teaspoon dried dill
1/2 teaspoon salt
1/4 teaspoon pepper
1 clove garlic, finely chopped
4 gluten free hamburger buns, like Dr. Schar's version or your own homemade ones
1 thinly sliced tomato

In a small bowl, mix 1/2 of the cup of yogurt with other sauce ingredients, place in refrigerator, covered, and chill. Heat grill or grill pan to medium heat. In another medium bowl, add burger ingredients and the rest of the yogurt and combine well. Shape into four patties, about 1/2 inch thick. Put patties on the grill and cover; cook 8-10 minutes, flipping after 5. Burgers are done when a thermometer inserted into the center reads 160 degrees. Serve on warmed gluten free buns with tomato slices and yogurt sauce.

Happy eating!

Monday, September 13, 2010

What To Do With All Those Tomatoes...

I have some tomato plants in my garden. Not as many as my dad, but still, more than one. So I get a lot of tomatoes lately. I bottled some *yay me* and most of the others I will eat like this
or on a BLT or salad, what have you. But the other day I decided to treat myself to some fresh, italian style pasta, and had my basil plant not died this year, it would have been even more italian styled.
I simply boiled up my Tinkyada pasta noodles, minced a clove of fresh garlic, diced a fresh tomato, and tossed it all with freshly grated parmesan. Mmm. It tastes like the end of summer to me.
Happy eating!

Tuesday, August 10, 2010

Pier 49 Gluten Free Pizza: A Summer Saver

There are so many things to enjoy in the summer when you have short people in your life. Namely, days like this: when you go see Toy Story 3 and you have to re-create Mr. Tortilla Head when you get home. However, I'm lucky because my summer has been full of so many other fun experiences as well, namely, watching my dad do this with his car to my mailbox one day, hosting a baptism and letting my son do his first scout camp *yikes*going to movies in the middle of the week with this guy, and redecorating my kitchen and family room in one day. (Seriously, one day I just had it and I sewed eight curtains and four pillows, cleaned out every cupboard, and ransacked Target for large canisters because I'm tired of looking in three different places for my most-used ingredients. Sometimes a girl's gotta do what a girl's gotta do.)
But one of the fun things I like to do especially in the summer (which I think most Americans enjoy doing) is not cooking dinner and ordering a veggie pizza and watching a movie with the family. (Hint: if you want a little bit of gross, get Diary of a Wimpy Kid. If you're into dry humor, Cloudy with a Chance of Meatballs. Romance? We're still stuck on Enchanted.) Good thing my friend JoLayna tipped me off to the gluten free pizza crusts at Pier 49 pizza. I must say, something about not making your own pizza just makes me feel like I'm the richest girl on the block. I always and forever will add artichoke hearts to my pizza. It gives it just the right....pizzaz! Such a great word to describe pizza, don't you think? Not that I'm too good for your basic ham and pineapple...I'm usually good for that one, too. But veggie is definitely my favorite. Beware, if you think you are going to order a gluten free pizza, pay $5 and get something like you see in a Domino's ad, just stop thinking that right now. You won't, okay? You will get something that is much smaller than a small pizza that costs almost $20 that only has 8 slices and the crust will still taste a bit off, but you will STILL, I repeat, STILL BE EATING A TAKEOUT PIZZA. Just take your lumps and appreciate the good in this. No cooking, leftovers for breakfast, feeling pretty dang normal, and chances are you'll get the whole thing to yourself. I'll take that at least once a summer. Sometimes more. Sadly, Pier 49 is a franchise that is only open in Utah and Idaho right now. Leave a comment and let us all know where YOU get your gluten free pizza, wherever you are in the world.

Happy eating!

Sunday, August 8, 2010

Gluten Free Chicken and Red Rice: A One-Pot Wonder


My mom and I used to live in Brownsville, Texas, which many of you may know is almost the end of the world. Just kidding, it's the southernmost tip of Texas, but the line between Mexico and the U.S. is pretty blurry right there. Which is good, because can you ever get the best guacamole in Brownsville, Texas. Luckily, my mom acquired some pretty good Mexican cooking recipes while we were there, and it was a great chance for me to get to know my favorite cuisine VERY well. My mom used to always make this dinner for me. I think it's one of my top 5 requested dinners of all time. Now that I think about it, I probably liked it so much because it's naturally gluten free. I'm sure my body was crying out for the non-gluten food when I was a kid, and this one definitely fit the bill. I hope you like it, too.

Gluten Free Chicken and Red Rice

4 chicken breasts or 6 chicken tenders
1/2 cup oil
1 cup uncooked white rice
1/2 diced onion
1 clove minced garlic
1 8 ounce can tomato sauce
2 1/2 cups boiling water
salt and pepper to taste
Heat oil over medium heat in a large frypan or electric skillet. Brown chicken in oil until it's lightly golden on both sides. (Chicken does not have to be cooked all the way through at this point.) Remove chicken from oil and add rice to pan. Toast until rice is golden, 1-2 minutes. Add onion , salt and pepper, and cook for 1 minute until onion softens. Add garlic, cook for 30 seconds. Add tomato sauce and water and stir well. Bring to a boil. Add chicken and cover pan with a lid. Turn heat to low and let simmer for 30 minutes or until rice is done and chicken is cooked through. Makes great leftovers.
Happy eating!

Thursday, July 22, 2010

Gluten Free Stroganoff with Kick!

I am pretty much a creature of habit when it comes to recipes. I make the same thing over and over exactly the same way. But the good thing about writing a food blog is that you're forced to try new things that people will want to try. I know that there are certain laws of cooking that should always be obeyed, but sometimes the occasional creative thought can really jazz up a recipe enough to make you think, why didn't I ever do that the last 15 years I cooked that dish? Why am I so boring? And I am about to have a housewife moment and tell you how I changed the landscape of beef stroganoff forever.

I usually pull out the rice for my stroganoff. I would do noodles, but I am a fan of rice anyway and rice makes a lot from a little when you cook it. Plus, I have 5 kids! What kid doesn't like rice? Okay, don't answer that. I'm sure they're out there. Anyway, I pull out the rice and then I usually throw the same three ingredients into a pan and call it good: Progresso Creamy Mushroom soup, 1 pound of browned and drained ground beef, and 1 cup of sour cream, with a little minced onion for flavor. Good enough, right? Well, the other day I totally brainstormed this:That's right. I put 2 Tablespoons of ranch dip mix into my stroganoff with these: 3 sliced mushrooms sauteed in 2 Tablespoons of butter and garlic salt. I'm telling you, it turned it into love on a platter. So here's the recipe for Gluten Free Stroganoff with a kick:
Gluten Free Ranch Stroganoff
1 pound hamburger
1 can Progresso Creamy Mushroom Soup
1 cup sour cream
1 T dried minced onion
2 T Hidden Valley Ranch dip powder
3 mushrooms
2 T butter
1/2 tsp garlic salt
Brown the hamburger with the minced onion and drain it. Add 2 T of butter in a small saute pan and melt over medium heat. Slice the mushrooms and add to the butter. Sprinkle mushrooms with the garlic salt. Add the soup, sour cream, ranch dip powder to the hamburger and heat over medium until it comes to a slow boil. Reduce heat. When mushrooms are lightly golden on both sides, add them to the meat/soup mixture. Serve over rice.
Happy eating!

Monday, July 12, 2010

Adventures in Rice Cooking


I have always been one of those women who shies away from small appliances. I never know where to store them, I hate dragging them out to use them, and plus, I always think in the event of the natural disaster that I always think is going to hit one day, like "The Big One," I should be able to cook things without little appliances that I won't be able to fit into my 72-hour kit. However, I can't deny that my busy lifestyle would benefit from some of these gadgets that seem to make life effortless for the average housewife. That, and the fact that I have a 13-year-old who is now cooking dinner once a week and she can't cook rice AT ALL. Three times she's made it, three times we've thrown it away. So while shopping at Costco the other day, I did something I never do: I marched right up to the small appliances aisle and bought a rice cooker. There are actually great reasons to own a rice cooker if you are a celiac, including perfect warm rice whenever you need it, but also being able to cook some of the more pesky grains like quinoa, brown rice, and buckwheat with it. I don't know all the ins and outs yet, but as I figure out how to use this little gadget, I'll share the info.
The first thing I made was a brown rice/wild rice pilaf with chicken stock and minced onion. It actually turned out to be quite tasty. Here's how I did it:
1. Add 1 scoop (3/4 cup) uncooked brown rice and 1 scoop uncooked wild rice.
2. I filled the line inside the rice cooker to the "2" with Swanson's Chicken Broth.
3. I added 1 T dried minced onion.
4. I pushed the "brown rice" button on the machine.
Wild rice takes a bit longer than any other rice to cook, so don't be surprised if it takes a lot longer to cook this than your other rices. This was a great side dish and I felt so healthy eating it.
Happy eating!

Wednesday, June 23, 2010

Gluten Free Chicken Kebabs--Summertime and the Grillin' is Easy

You've gotta love summer. Not only do you not have to set the alarm clock (unless you have basketball camp and scout camp and pioneer trek, but who's counting), but you don't even have to turn on the oven for dinner unless you want to. I don't know about you, but I never want to, so we almost always have dinner on the grill in the summertime.
While perusing the butcher's section of the grocery store the other day, I noticed that they have premade kebabs with both chicken and steak on them that you can just plop onto the grill and bam, dinner's done. However, they come pre-marinated in a sauce that has no ingredients listed, so I'm always suspect of sauces like that. Chances are they're safe, but I never want to take chances. So I decided to make my own. Turns out they are one of my new favorite summer foods.
I waltzed right over to the produce section and picked out the cast of characters: red onion, yellow and green zucchini, red pepper, and huge mushrooms. I usually use my old favorite standby, Kraft Tuscan House Dressing, when I reach for a marinade, but I perused the ingredient lists and thought I'd give the Kraft Sun-Dried Tomato version a try. I got a package of chicken and went home ready to try out my kebab making skills.
All you need to know about kebabs is this: make sure your veggie cuts are chunky enough that they don't fall off the kebab into the fire during grilling. I slid everything onto a skewer and poured about 1/3 of a bottle of the dressing over the meat and veggies while they were resting in a 9x13 pan to soak in the flavor of the marinade. I turned them a couple of times during the half hour I let them soak in the refrigerator.
Then I heated up the grill and put them on over medium high heat for about 4 minutes per side. I think I turned them three times to other sides of the kebabs and every time I turned them I basted them with a little bit of the leftover sauce in the 9x13 pan. The first two times I turned them I shut the lid on the grill but the last turn I left it open so I could check to see if they were done. You can take them off when the chicken is cooked through and the juices run clear, and the zucchini is to your desired tenderness. It took about 12 minutes to cook them.
And wowee! What a meal! Grilling the vegetables really brings out a mellow sweetness to them, especially the onion and peppers. I could not get enough of this meal. I've actually had a dream about it a night or two since I made them. Now I know what to do with all my extra veggies from the garden this summer!
Oh, and the other good thing about summer? You get to spend it with your best buddies, whether in the movie theater or out. Less time cooking, more time best buddying. Worth every second.
Happy eating!

Friday, June 4, 2010

Fish on Fridays, Part 2: Baked Orange Roughy with Lemon

Don't worry, I haven't forgotten about y'all! The problem with being a blogger is sometimes the guilt that comes from not writing as much as you want to because of a little thing called life that gets in the way. I need to work on that. Anyways, it's time for Episode 2 of Fish on Fridays, my foray into cooking one of America's favorite healthy foods. My disclaimer here is that I am by no means a professional fish chef, and apparently not a professional fish photographer, so all of these recipes are going to be easy, fast, and possibly idiot-proof. This week's recipe is for a gluten free baked Orange Roughy.

Orange roughy is a mild, white fish that is easy and delicious when baked. When I was in college my friend Jake taught me how to make this dish, although back then we used flour. I remembered how easy and tasty this was, so I tweaked the recipe just a bit and still got the great taste I've always remembered. First, I breaded a filet of orange roughy in cornstarch mixed with a little bit of salt and pepper. I placed it into a baking dish sprayed with Pam and drizzled the fish with a little bit of melted butter (about 2 T) and a squeeze of 1/2 a lemon. I baked it in the oven at 350 degrees for about 20-25 minutes, or until it flakes easily. (Remember, flaky is good with fish.)
Then I served it up and was actually impressed with the texture of the breading and the overall flavor of the fish. Cornstarch will make things have a little bit more crispy coating, and I liked it with the roughy. Voila! Fish in a flash, I should say.

Happy eating!

Friday, May 28, 2010

Fish on Fridays: Spicy Salmon on the Grill


As I've said before, one of the things I rarely cook is fish. I hate smelling fish in my house after I cook it, and I hate touching it. But I have decided to branch out with my menus and I've actually discovered some tricks that I think will help you other fish-haters out there. The first thing I've learned is that fish is actually really easy to cook, and now that it's semi-good weather in Utah, I can also grill it and not have to deal with the house smelling like salmon for two days. Bonus. I also like to buy my fish frozen, like I did here, because it really does eliminate a lot of the smell factor when preparing it.
So, at WalMart the other day I discovered that they have salmon filets for $4.95 and you get 4 frozen pieces. Score! I put two of them into a bowl of lukewarm water and when they were soft and thawed I put them on a plate and just drizzled extra virgin olive oil over them and sprinkled some of the McCormick Grill Mates Salmon spice blend on both sides. So easy! And I love that McCormick is so gluten free. Almost every spice they have is gluten free and that makes them stars in my book. Then I grilled the filets on the grill for about 5 minutes per side, until they flaked easily with a fork. That is the whole deal with fish and doneness, I've learned: look for the flaking. I served them up to my husband as a big old surprise for dinner, not only that we were eating fish but that it wasn't burnt to a crisp off the grill. (I have issues.)

Anyway, hope this gets the ball rolling for all of you non-fish eaters out there, and if you are a big fish eater and you have a favorite recipe you'd like to share with the rest of us rookies, please leave a comment...maybe you'll be the next one on Fish on Fridays!
Happy eating!

Wednesday, May 26, 2010

Gluten Free Tater Tot Casserole

One day I was minding my own business, watching TLC, when I totally saw someone cooking Tater Tot Casserole on a special about the Duggars, who are the people with 19 children, if you can believe that. Well, actually I can believe it, because this is a great recipe that you can feed picky hungry kids and make a pound of hamburger go a long way. No wonder the Duggars are making it. I was under the impression that this is totally a Utah recipe, but apparently not. And I'm also figuring out that there are endless ways to vary the recipe, but here's how I do it:

First, brown 1 pound of extra lean hamburger and drain the grease. I add some dried minced onion while it's browning. Second, add 1 small package of frozen mixed vegetables to the meat and one can of Progresso Creamy Mushroom Soup and mix well. This Creamy Mushroom soup is a little hard to find, but it's worth it when you do. It's the only gluten free cream of mushroom soup I have found that actually tastes good. Third, spoon it all into a greased 8x8 baking dish and top with frozen tater tots. Fourth, pop it into a 375 degree oven for 35 minutes. Then top with shredded cheddar and back into the oven for 5 more minutes until melted and golden.I know mine looks like a 9x13 pan, because it is! I doubled my recipe when I made it, so there's a lot here.
This is seriously one of those recipes where I do the social experiment of making a plain, humble casserole and serve it on fancy dishes to see if I get any comments about how lovely the meal is. So far my husband is not playing that game. But we are full and it is also a meal that won't break the bank. Hey, in a recession, you gotta do what you gotta do.

Happy eating and don't forget the first episode of "Fish on Fridays" tomorrow!
 
Blog Design by April Showers