Off the Wheaten PathOff the Wheaten PathOff the Wheaten PathOff the Wheaten Path

Friday, July 30, 2010

I've Been Living Without It for Far Too Long...


What you see here is the cover of the only magazine I'm aware of that is specifically devoted to gluten free food for celiacs and gluten intolerant people. While I consider myself fairly savvy when it comes to gluten free living, I have to admit I haven't been a regular subscriber lately. When this magazine first came out a few years ago, I signed right up and got myself a subscription. But back then it was only published four or five times a year, so when my subscription ran out I sort of forgot about it. One day last week I was dawdling at the grocery store, too tired to unload my $300 worth of groceries onto the ramp and so bored of listening to my kids fight over the XBox at home that I took a rare turn down the magazine aisle. I'll admit, I really wanted to see some juicy celebrity gossip (is it really worth it to be famous? And why is Kourtney marrying Scott? Really?) but I found the most recent issue of Living Without magazine and snatched it up. When I got home and finally put away the last of all those groceries, I took a few minutes and read it. What have I been doing, writing a food blog about gluten free food and not even reading this resource diligently? Slacking, that's what. The funny thing is that I always think of foods that I want to try out, and this issue had recipes for both snickerdoodles (made by a 12-year-old!), smoothies, and zucchini pancakes, all of which are on my list to try. It also has a quick start guide for both gluten free and casein free diets in the back of the magazine for people who have just been diagnosed to get started eating right, or for old hacks like me who need a refresher once in a while. But the other part of Living Without that is just as helpful as the recipes is the ads for new gluten free products in there. I found, drum roll please, gluten free ice cream cones, which will be part of a post to come in a few days. I never would have even gone to Whole Foods to find them if I hadn't seen the ad in the magazine first. If you have celiac's disease and you haven't been reading this magazine, check their website and subscribe today!

Happy reading!

Wednesday, July 28, 2010

Officially the Cutest Gluten Free Snack on the Planet: White Chocolate Covered Marshmallows


I was in Park City, Utah with my family a couple of weeks ago, and our tradition when we go there is to always stop at the Rocky Mountain Chocolate Factory and get a caramel apple. Well, two kids in braces and one cranky three year old later, we left with a whole bunch of gummy bears and a new treat: white chocolate covered marshmallows. They were so cute in the store and when I tasted one I expected a sugar rush, but holy cow Harry Carey, I didn't expect them to be as completely delicious as they were. Of course three days later I was in the kitchen trying to make my own, which turned out fine for the eating, but then I asked a friend who is close to a master candy maker how I could make them better, and I got the whole scoop. So you'll have to look at my sloppy photos, but do as I say, don't do as I photograph. The best part of this snack is that I've never ever encountered a gluten-filled marshmallow. They are completely on the safe list as they always use cornstarch. And most chocolates are gluten free, it's usually the things they put into the chocolate that you have to watch out for. So dip away, my friends, and enjoy a brand new treat for summer.

Gluten Free White Chocolate Marshmallows

16 large marshmallows
8 dowels or popsicle sticks (they usually sell these at food supply stores or in the candy making section)
5 squares of White chocolate by Baker's
Sprinkles, cinnamon, or nuts--whatever your favorite flavors are
Place two large marshmallows on the bottom end of a small dowel. Melt the chocolate in a medium sized bowl *larger than the one you see above!* for 1 minute in the microwave. Stir and melt for 1 more minute. Stir well and quickly begin dipping the marshmallows, using a spoon to help get the chocolate up onto the top of the marshmallows. If you want an extra topping on them like sprinkles, cinnamon or nuts, dip one side of the marshmallows in them and then stand them up onto a silpat-lined cookie sheet. When you are finished dipping them, place the cookie sheet in the refrigerator to let the chocolate set up. I actually keep these in the fridge in the summer so they don't melt in the hot kitchen.
I learned that chocolate chips are actually the worst kind of chocolate to use for dipping because they seize up really easily when they are overheated. Siezing chocolate looks crumbly and dry and will ruin the taste of your chocolate. The best kind to get is the dipping chocolate discs at a food supply store, called something like Callebut, but I haven't checked the labels to make sure they are gluten free yet.
Happy eating!

Monday, July 26, 2010

Gluten Free Zucchini Parmesan: Use Up the Extras!


This year I planted not one but two zucchini plants in my back yard. I know, I know. I'm crazy because how will I ever use up all that zucchini I'll get out of it? Everyone knows it's the bane of summer when your neighbors come over with a huge zucchini for you, all smiles, and what do you do with it? Look at it on the counter until you throw it away, that's what. Well, I actually planted an extra plant this year because last summer I finally became a fan of zucchini when it wasn't baked into a bread or a soup or a muffin. I actually ate it by itself. Wow. My dad almost fainted dead away when he heard the world's biggest proponent for zucchini extermination was actually eating ones she grew in her back yard. As the World Turns, I know.


I have a few tips for you about zucchini. First of all, pick them when they are small. Usually you'd want to pick them when they are about 8 or 9 inches long. They are tender and tasty then. The reason no one likes zucchini is probably because they are eating ones that are two feet long and as big around as a softball. Those zucchini are tough and fibrous, not good for eating plain. When you get a big one like that, slice off the slimmest end and grate it up to use in muffins or breads. You can even put it in one cup portions in a ziploc and freeze it to use in the winter. Just drain it well after you thaw it. Secondly, zucchini will take on whatever flavor you put on it, just like mushrooms. So if you love Indian cuisine, try some curry powder on your zucchini. Love the spicy foods? Try sauteeing it with some cayenne or red pepper flakes. Me? I love the Italian flavors, so I always do Zucchini Parmesan, which isn't anything like Chicken Parmigiana, okay? It's just the name I made up for this side dish.
Gluten Free Zucchini Parmesan
1 8-inch zucchini, sliced into rounds
1/2 stick of butter
pinch of salt
pinch of pepper
dried minced onion
1 minced garlic clove
2-4 T freshly grated parmesan cheese

In a large frypan, melt the butter and add the zucchini slices. Sprinkle with the pinches of salt and pepper and arrange the slices in a single layer in the pan. Let brown for a few minutes so the zucchini starts to get tender, and flip over when slices are lightly browned on one side. Let brown on the other side, Add minced onion and garlic and saute for 1 minute, then grate Parmesan cheese right over the top. Let cheese melt for 1 minute, then serve.

You can do this recipe with or without the garlic. I happen to really love garlic, but if you don't, you can leave it out and it will still taste divine. The best thing about zucchini, really? Naturally gluten free, baby.

Happy eating!

Saturday, July 24, 2010

It's Summer, It Must Be Potato Salad Time

Every summer it's the same thing: I get so tired of the hot kitchen that I just make up a huge batch of potato salad on a weekday and keep it in the fridge to go with whatever we are grilling that night. Something about eating something cold but savory in the summer really makes me happy. And I'm here to tell you that lots of folks out there like my brand of potato salad. Wanna know why? I don't put anything crunchy or weird in it. I really hate biting into a nice, creamy bite of potatoes and eggs and mayonnaisse and finding...bacon? Or celery? Pickles? Or red onion? Or red pepper? No! Crunch does not go with chunky creamy, okay? That's why so many people hate potato salad, I think. There's a little too much wierd going on inside. Don't get me wrong, I love bacon, red onion, pickles, and the other kinds of crunchy things in other dishes. Just not in my plain potato salad. This is one of those things that my mom used to always make while I was growing up, and eating it when it's hot outside makes me remember the days when life wasn't so busy and all I had on my mind was what I would wear to the parade on Saturday. She knew I didn't like all the crunchy stuff, so she made it just the way I liked it. I'm so spoiled. So if you're feeling like a walk on the tame side, give this dish a try.

Mom's Potato Salad

6-8 baked potatoes (You can cook them either in the oven or microwave, it doesn't matter)
6-8 hard boiled eggs (I try to do 2 less than however many potatoes I'm using)
1 cup Best Foods Light Mayonnaisse
2 T yellow mustard
pinch of pepper
1/2 tsp garlic salt
1/2 tsp onion salt

In a small bowl, combine the mayonnaisse, mustard, and spices and set aside. Let the potatoes and eggs cool until they are easy to handle. Peel and cube the potatoes. Peel and dice the eggs. (I like to use an egg slicer for this, it makes it so easy.) Layer half the eggs and potatoes in the bottom of a large bowl and add half the mayonnaisse mixture. Layer the second half of the potatoes and eggs and the rest of the mayonnaisse mixture. Mix well. Chill, covered, in the refrigerator for 2-3 hours so flavors can meld together.


Happy eating!

Thursday, July 22, 2010

Gluten Free Stroganoff with Kick!

I am pretty much a creature of habit when it comes to recipes. I make the same thing over and over exactly the same way. But the good thing about writing a food blog is that you're forced to try new things that people will want to try. I know that there are certain laws of cooking that should always be obeyed, but sometimes the occasional creative thought can really jazz up a recipe enough to make you think, why didn't I ever do that the last 15 years I cooked that dish? Why am I so boring? And I am about to have a housewife moment and tell you how I changed the landscape of beef stroganoff forever.

I usually pull out the rice for my stroganoff. I would do noodles, but I am a fan of rice anyway and rice makes a lot from a little when you cook it. Plus, I have 5 kids! What kid doesn't like rice? Okay, don't answer that. I'm sure they're out there. Anyway, I pull out the rice and then I usually throw the same three ingredients into a pan and call it good: Progresso Creamy Mushroom soup, 1 pound of browned and drained ground beef, and 1 cup of sour cream, with a little minced onion for flavor. Good enough, right? Well, the other day I totally brainstormed this:That's right. I put 2 Tablespoons of ranch dip mix into my stroganoff with these: 3 sliced mushrooms sauteed in 2 Tablespoons of butter and garlic salt. I'm telling you, it turned it into love on a platter. So here's the recipe for Gluten Free Stroganoff with a kick:
Gluten Free Ranch Stroganoff
1 pound hamburger
1 can Progresso Creamy Mushroom Soup
1 cup sour cream
1 T dried minced onion
2 T Hidden Valley Ranch dip powder
3 mushrooms
2 T butter
1/2 tsp garlic salt
Brown the hamburger with the minced onion and drain it. Add 2 T of butter in a small saute pan and melt over medium heat. Slice the mushrooms and add to the butter. Sprinkle mushrooms with the garlic salt. Add the soup, sour cream, ranch dip powder to the hamburger and heat over medium until it comes to a slow boil. Reduce heat. When mushrooms are lightly golden on both sides, add them to the meat/soup mixture. Serve over rice.
Happy eating!

Tuesday, July 20, 2010

Omelets: Gluten Free and (Not So) Easy

I will admit: I've been trying to make myself omelets for 20 years. And for the last 20 years I have giggled at myself every time I try to make one. Who in their right mind thinks that they can flip over a circle of egg 8 inches in diameter without it breaking apart? So I keep trying, and I know that professional chefs have got this skill mastered so that their omelets look perfect, but I still end up with ones that look like this: 
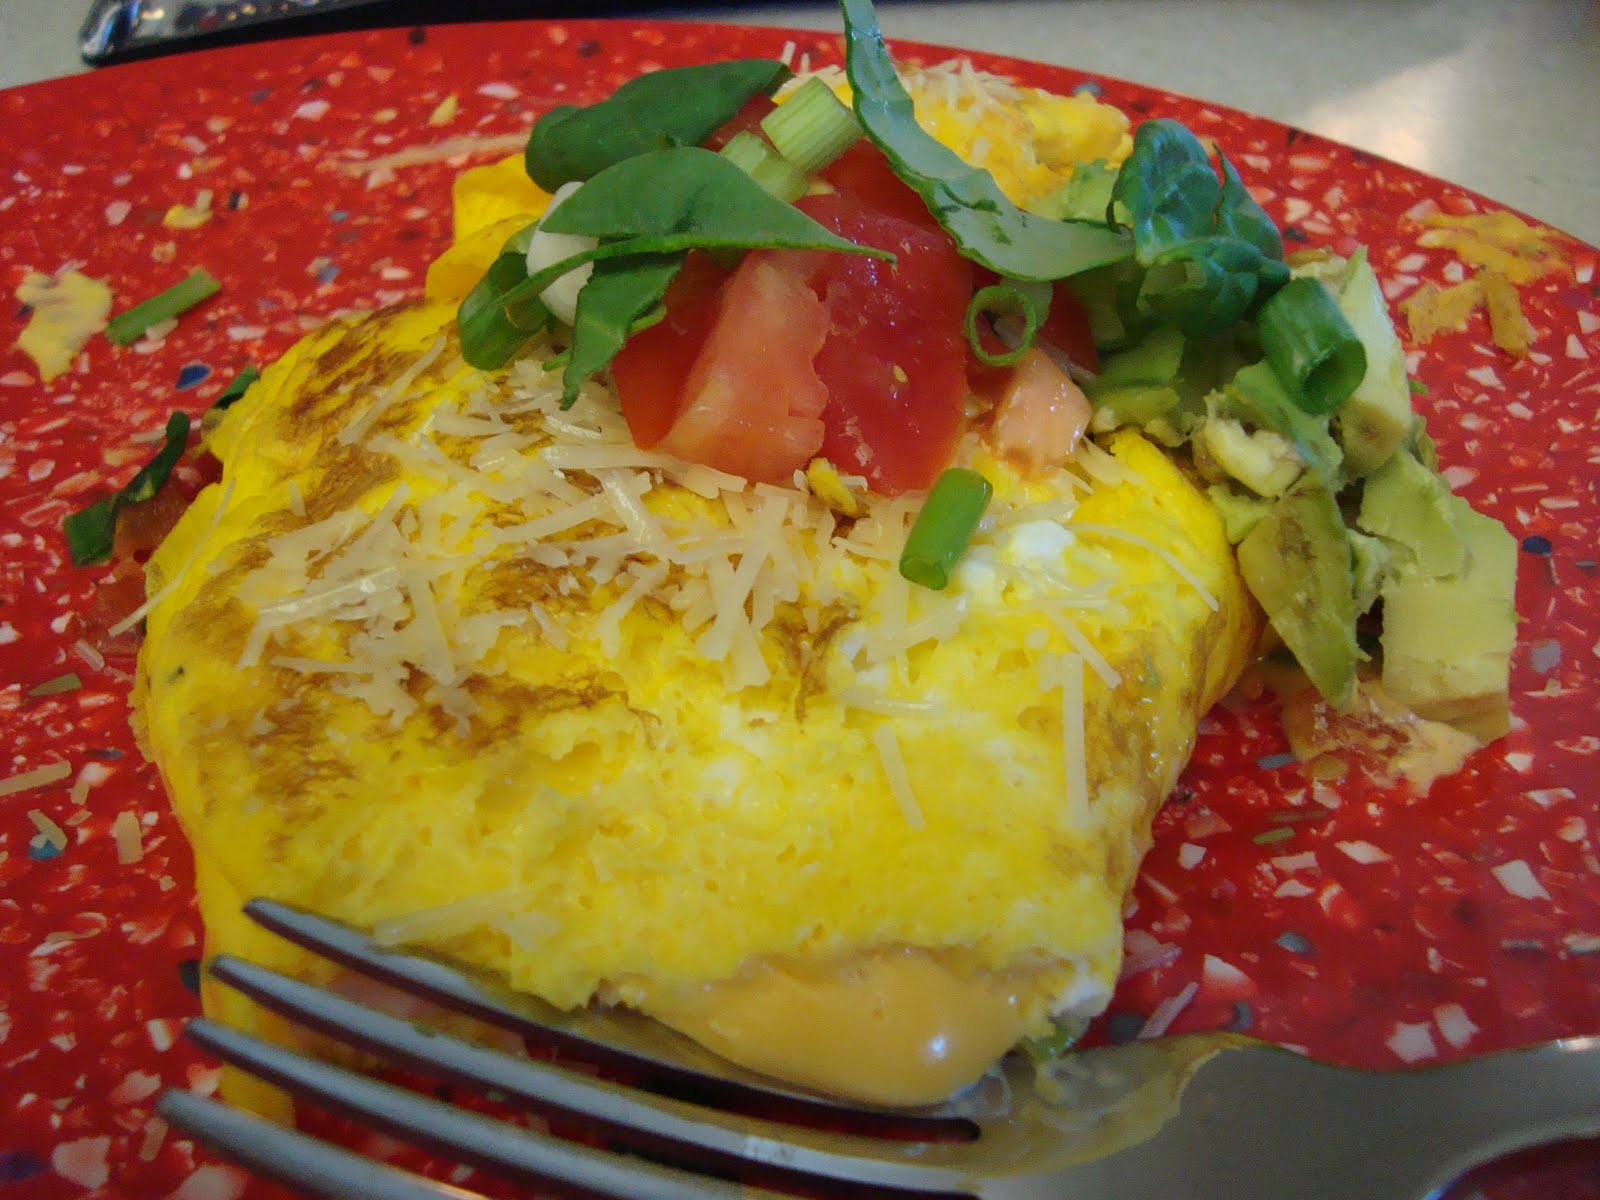
So don't take my advice on the flipping, but you can take my advice on the filling. The great thing about omelets is that you can pretty much put anything you can think of inside of them and they will taste great. I've used ham, bacon, cheese, tomatoes, mushrooms, avocado, spinach, green onion, zucchini, and salsa inside my omelets, and I have yet to be disappointed. And, as a further confession of guilty pleasures, this is the one and only time I ever eat American Cheese. You know the cheese I'm talking about, the one that says pasteurized cheese product on the side and comes in the natural shape of a square. One day I was out of all cheddar at my house and was stuck with only American in the bottom of the fridge drawer for kid's grilled cheese sandwiches, and I just put it in. Mmmm. Melty and delicious with omelets. It melts everything together and almost turns into a sauce when it's finished. So here's my recipe for omelets:


1. Beat three eggs with 2 T milk and one pinch of salt in a small bowl. Heat a frying pan (I use a 10 inch pan) to medium heat and spray with nonstick cooking spray.
2. Pour the eggs into the pan and let them set until you can pull the edges on all sides away and the middle is a little bit puffed up.

3. Flip over the eggs in one flip. Laugh at yourself when you fail. Act like Julia Child and just mash it together.
4. On the cooked side of the omelet, choose one half and layer some cheese (on the bottom so that it acts like glue for the other ingredients), veggies (my personal favorites are spinach and tomato) and pre-cooked meat if you want. Then add a little bit more cheese to keep it together.
5. By this time the other side of the eggs should be cooked and dry, so flip up that side over the filling and let it sit until the cheese melts. If you are really tricky you can flip it over onto the other side so that the cheese can melt faster on the top and the bottom doesn't get too brown.
There you have it: the unofficial guide to un-perfect omelets. Leave a comment and let me know, what are your favorite omelet fillings?
Happy eating!

Friday, July 16, 2010

The Fabric Whisperer

I am lucky (or stupid?) enough to cook on television once in a while. It's fun and exciting and very stressful (have you ever watched Next Food Network Star? There's a reason those people look stupid cooking on camera and then bite each other's heads off...it's hard!) I always get excited about doing it beforehand and I'm always relieved when it's over. One of the things that is the fun part is deciding what to wear on the show. I like to wear aprons when I cook on TV, not because they're flattering (they're not) or because they're slimming (they're not) but because it's a simple way to inject personality into the segment. The viewers see someone who likes to have fun with food and colors and fabrics and isn't afraid to be different. That and plus I always, always, always spill on myself. Just ask my husband. :)
So I've been getting compliments from people about my cute aprons that I wear on air, and I wanted to share one of my resources with you, because, you know, sometimes you want to be gluten free and cute at the same time. And this is going to ruin my little stash of cute pins and aprons now that I'm telling you all, but I can't keep it in any longer. The apron I'm wearing in the picture above is from The Pleated Poppy, made by my friend Lindsey Cheney, who happens to be a fabric whisperer, if you've ever heard of that. See, that's me, on the right. Don't I look just like I fit right in? Of course except that in real life I'm a foot too short and probably 14 pounds too heavy to actually pull it off. Anyways, I always add one of Lindsey's poppy pins or something cute to my aprons so they look unique. She has some darling stuff in her shop right now, so check it out. I know she's low on aprons, but check back often because she adds new things daily. My new favorite are the cases she's made for sunglasses, so they don't get all scratched up in your purse. Genius!

So thanks for watching, and now when you see me on tv spilling spaghetti sauce all over myself, you'll know at least I'm spilling on something cute!
Back to more gluten free food soon!

Happy shopping!

Monday, July 12, 2010

Adventures in Rice Cooking


I have always been one of those women who shies away from small appliances. I never know where to store them, I hate dragging them out to use them, and plus, I always think in the event of the natural disaster that I always think is going to hit one day, like "The Big One," I should be able to cook things without little appliances that I won't be able to fit into my 72-hour kit. However, I can't deny that my busy lifestyle would benefit from some of these gadgets that seem to make life effortless for the average housewife. That, and the fact that I have a 13-year-old who is now cooking dinner once a week and she can't cook rice AT ALL. Three times she's made it, three times we've thrown it away. So while shopping at Costco the other day, I did something I never do: I marched right up to the small appliances aisle and bought a rice cooker. There are actually great reasons to own a rice cooker if you are a celiac, including perfect warm rice whenever you need it, but also being able to cook some of the more pesky grains like quinoa, brown rice, and buckwheat with it. I don't know all the ins and outs yet, but as I figure out how to use this little gadget, I'll share the info.
The first thing I made was a brown rice/wild rice pilaf with chicken stock and minced onion. It actually turned out to be quite tasty. Here's how I did it:
1. Add 1 scoop (3/4 cup) uncooked brown rice and 1 scoop uncooked wild rice.
2. I filled the line inside the rice cooker to the "2" with Swanson's Chicken Broth.
3. I added 1 T dried minced onion.
4. I pushed the "brown rice" button on the machine.
Wild rice takes a bit longer than any other rice to cook, so don't be surprised if it takes a lot longer to cook this than your other rices. This was a great side dish and I felt so healthy eating it.
Happy eating!

Thursday, July 8, 2010

French Meadow Bakery: A New Frontier


I have this friend who knows all of the great haunts in town. She can find fabric, food, stickers, crafty stuff, furniture, and small shopping coups if you only ask her. One day she came to my house after one of her excursions from a store called MPS in Salt Lake City that is like a manufacturer's clearing house, where they send all of their seconds and food that is about to expire and stuff they just want to sell quickly and get rid of, and she plopped down some gluten free treats from a bakery I'd never heard of before: French Meadows. I was lucky enough to receive a chocolate cake and a vanilla cake (!) all to myself. These are little mini-cakes, one serving is about a third of the cake. Don't worry, they look cute now, but this is how mine really look in the back. I really couldn't help myself. This is the great thing about these cakes: not only are they decorated beautifully with swirl upon swirl of frosting, the cake is moist and actually holds together instead of being crumbly and dry. I was in gluten free heaven that day. She also brought me a few delicious blueberry muffins that I must say were so welcome in my daily breakfast repertoire. First of all they come individually wrapped and can be frozen and defrosted quickly for just one person. They are also a little bit smaller than the mini-planet-sized muffins you usually get that are about a million calories, and I like that I could take a bite of them and actually fit it into my mouth. They are moist and have real blueberries in them and are a perfect little breakfast snack.


Now for the bad news: I have no idea what stores sell these products! I checked the French Meadows bakery website and apparently it's down now while they fix some issues with their packaging. This means that the store locator is not available. If you know where you can purchase these products, please leave a comment for the rest of us until the website comes back up and we can search away. I'd really like to see what other flavors and options they have available, because these were delicious and lovely, two of my favorite things.


Happy eating!

Sunday, July 4, 2010

Summertime is Obviously Not Cooking Time


Apparently I have issues with continuity in the summer months. I used to post three to five times a week and now I'm down to once a week, if you're lucky. Hmm...I want to feel guilty, but I'm too busy enjoying my children's boring schedules and waiting for the new thermostat to come in the mail so my house isn't so hot. I've also killed my first hanging basket plants and I'm hosting a luncheon for my son's baptism on Saturday, all while watching every episode of Sarah's House on HGTV three times because I love it so much I can't get enough of it. And it's finally hot here in Utah and the only way I can really measure that is because I'm on page 589 of an 898 page book because I've sat in my bedroom reading because it's the only cool room in the house. 589! I haven't done that since Harry Potter 5 came out. And it's no wonder I haven't posted because I think I'm finally brain dead from the down time because today I realized I forgot to do two very important jobs that I usually do before the first day of the month: a bulletin board I'm in charge of for church and writing out the bills. Writing out the bills! That's sort of a big one! What I'm trying to say is, fear not. I have not forsaken Off the Wheaten Path...I'm waiting on a blog redesign and I've got some fun stuff I want to try out soon. I really do have some cool pictures and recipes that I'll post this week, but first I have to find my camera.
Happy summering!
 
Blog Design by April Showers